This is “yet another howto” set up xdebug on Laravel homestead with PhpStorm.
Homestead has xdebug extension installed out of the box. Latest PhpStorm versions offer Zero-configuration Web Application Debugging so you dont need to create specific debugging configuration in IDE. The only thing you need to do is to add some more configuration options to xdebug config file.
Ok lets dig into it.
Laravel homestead box is based on Ubuntu, current latest box is Ubuntu 16.04.1 LTS. After Homestead setup successfull start of your box via”vagrant up” or “homestead up” you need to get into ssh login to your virtual machine.
The simplest way of establishing reusable ssh connection to your development box in PHPStorm is to create sftp deployment and then it will be accessible via Tools->Start SSH session… in dropdown list of availiable connections once you click this button.
Creating ssh connection in PHPStorm
To do this you need to go to Tools->Deployment->Configuration
Then click on + button to create new Deployment.

Name it as you like for example Vagrant, then select type: SFTP, host will be localhost and port 2222 as homestead maps this port for ssh access. Root path could be /home/vagrant it is usefull if you have more than one project so they usually placed inside /home/vagrant/project_name
User name will be vagrant and password vagrant too, check to save password so you won’t need to type it each time your connect.
Web server root URL could be your development url by default it is http://homestead.app
Click OK.
Then you can go to Tools->Start SSH session … and in opened dropdown list you’ll get your Vagrant item to connect to. Click to open ssh connection within Terminal below, it may ask you weather accept ssh connection for the first time just click OK and it will connect and open a shell for you in terminal at the botom of PHP Storm.
Adjusting Xdebug settings
Lets make needed changes to xdebug configuration file.
In terminal type
cd /etc/php/7.0/fpm/conf.d
Here are all configuration files for each php module loaded.
In order to modify any you need to call for example nano text editor through sudo as you need to have root permissions to edit config files.
sudo nano 20-xdebug.ini
And youll see your current xdebug configuration file, make it same as below with some changes.
zend_extension=xdebug.so
xdebug.remote_enable = 1
xdebug.remote_connect_back = 1
xdebug.remote_host = 192.168.1.10
xdebug.remote_mode = req
xdebug.remote_port = 9000
xdebug.remote_autostart=1
xdebug.max_nesting_level = 512
About xdebug.remote_host = 192.168.1.10 if your homestead box IP is 192.168.10.10 as default your own PC will have 192.168.1.10 address communicating through virtualbox virtual ethernet adaptor. With it you allow your PC to connect to xdebug to get debugging information.
Settings: xdebug.remote_autostart=1 , xdebug.remote_enable = 1 and xdebug.remote_connect_back = 1 makes xdebug to allow remote debugging and forces it to connect to PHPStorm, and automatically starts debuggin session.
In order to save it press Ctrl+O and press Enter. Then press Ctrl+X in order to close editor.
Last thing is to call php service to reload updated configuration.
sudo service php7.0-fpm reload
Testing debuging configuration
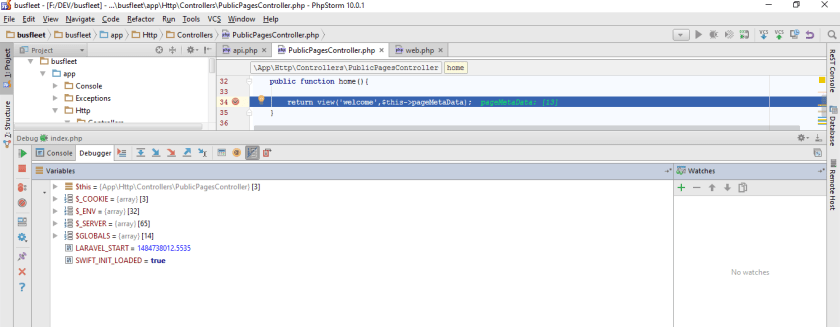
After this you just need to add break points to your code, click Start Listening for PHP Debug Connections ![]() it will become
it will become ![]() and open your debugging app in a browser to trigger php execution. It will automatically connect to PHPStorm giving debugging information and it’ll stop on your breakpoint.
and open your debugging app in a browser to trigger php execution. It will automatically connect to PHPStorm giving debugging information and it’ll stop on your breakpoint.
If if doesn’t happend possibly there are no path mappings specified to make it working go to Run->Break at first line in PHP scripts in PHPStorm and after you refresh a page in a browser it will stop at first line of your index.php and in debugging panel you’ll get a button, or dialog will popup to specify path mappings for project. There you need to write a path to your project’s directory on a development box for example by default it is /home/vagrant/Code
After this you are ready to debug PHP code with PHPStorm on Laravel/homestead virtual environment.
UPDATE:
Lets describe in real example how to set up path mappings because without this, it will not work, and only will stop on index.php
First step : Start Listening for PHP Debug Connections ![]()
Then reload your web page and it wil show you this dialog in PHPStorm:
Just click Accept
Then you’ll see a lot of notifications like:

Click on PHP|Servers in whatever of those messages and you’ll get to Path Mappings setup dialog

As you’ll see there’s only one path mapping only to /public directory what we need to achieve is we need to set up path mapping for whole project’s path on your development server.
Here’s my example:
![]()
So it is simply just topmost project’s path on your dev machine like /home/vagrant/projectsdir
Then click Apply and OK to save changes, NOTE : you don’t need forward slash at the end of path!
That’s all.
Just set needed breakpoints in your controllers and refresh your page in browser so it will call your controller’s action.
In some cases you’ll see alert to set path mappings in Debugger tab down below, clicking on it you’ll see same Path Mappings settup dialog, just set it same way as we’ve discussed earlier /home/vagrant/projectsdir click apply and ok and debugging will start ok.
Happy Codding!